
|
Tanning a Hide: It takes about one day to tan a hide. To do this the mother and children use their juniper tanning sticks to push and pull down against the hide. Tanning the hide stretches it, so during the process it has to be tightened, just as you might tighten your shoe laces. When starting to tan, the room has to be really warm. If one is a fast, experienced worker, two hides can be done in one day. After four hides are prepared then the hides are ready for smoking. |
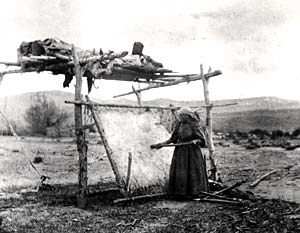 |
| Archival Photo of Scraping a Hide |
The process of tanning hides was often a woman's responsibility. The process varied depending on the type of hide used and individual preference.
For example after the husband cleaned a deer, he would give the skin to his wife, who would then begin tanning the hide. Often the children would help.
The day before tanning the wife would prepare a solution for tanning. Deer brains and bones with marrow were boiled, then, after it cooled down, the solution was strained to remove all the solids. The solution helped to remove the fur and keep the hide from becoming brittle when dry.
The first step in the tanning process is to take off the long hair, using a sharp knife. Then the deer skin is placed in the cold solution, leaving it to soak for a day. The boiled marrow of the bones helps soften the hide. After one day one the hide is taken out and put on a smooth log which has been braced up against a tree. Then whatever hair is left on the hide will be scraped off using a scraper.
Again, the hide will be put into another clean solution of deer brains and fat. Then it is taken out of the solution, wrung out with a cottonwood stick and stretched out as far as possible. This process gets all the solution out of the hide. After being wrung out the hide is fastened to each end of the stick. Then the rawhide is left as is and covered with a clean hide for about an hour. By this time the hide is dry and can be taken off the stick. At this point the person tanning has to be very careful because the dry hide can unravel very quickly, like a coiled spring, and be dangerous.
After it is taken off the stick the hide is quickly opened and stretched. At the same time another person will cut small holes around the edge of the hide. Smooth, clean red willow sticks, about two centimetres thick, are woven in and out of the holes. Then it is laced onto a prepared frame.
The frame was usually made out of peeled, dried out fir trees because they were light and strong with no pitch residue. Four poles about three metres long were tied together to form a square. Sometimes the length was different depending upon the size of the hide being prepared.
A hide scraping tool was used to soften the hide once it was on the frame. This tool had a long wood handle, which was made of juniper with a smooth round stone attached at the end . When girls helped their mothers the mothers usually fixed up the tanning sticks to fit the child. This is similar to a child finding the right size of hockey stick today.
Smoking the hides takes place away from the house. A small, domed structure made out of red willow is put over a pit dug about thirty centimetre deep. Inside the pit cottonwood was burned and cinders accumulated. Wood from old rotted stumps, stumps with no pitch and brown wood, not white, were also burned.
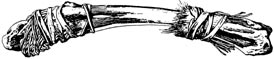 |
| Hide Scraper |
To smoke tan the hides, rotten wood is layered on top of the cinders and then a layer of cones is placed on the wood. After this the hides are placed around the frame. Then from a bucket nearby, water is sprinkled on the smouldering fire to create more smoke.
The hides are first placed on the frame structure with the inside of the hide closest to the smouldering fire. Hides have to be moved frequently so that an even colouring would be created. Once the desired colour was achieved the hides are turned over so that the outside is nearest to the smouldering fire. Again, the fire is carefully watched so as not to create a flame, but to continue smouldering.
|
|
